How to Share Content
Sharing Content
WebEx Conferencing Presenter Tools
Learn how to ensure a positive and productive WebEx experience with the extensive range of presenter tools available. A description and a guide are provided below.
- Sharing Content
- Presenter Tools
- View Tools
Sharing Content
During a WebEx meeting, the Presenter has the ability to share materials with all participants as shared Files, as a shared Application, or as a full shared Desktop:
File Sharing
File sharing is the recommended method of presenting materials. Use this when you want to present "static" files that are not going to be edited in real time.
Share files as PDF documents
In almost all cases, we recommend the use of PDF files. Most MS Office applications allow the user to "Save As PDF". If you need help converting/creating PDF files, please send a request to our support team.
Files can be of the following types:
- PDF files: .pdf
- Documents: MS Word (.doc/.docx/.txt)
- Presentations: MS PowerPoint (.ppt/.pptx)
- Image files: .jpg/.tif/.bmp/.gif
- Video files: .mp4
- Note: due to bandwidth limitations, we do not recommend the use of Video if possible
Pros
- Can be pre-loaded saving time during the meeting
- Is faster and more bandwidth efficient than application or desktop sharing
- Is ideal for sharing presentations or documents that you do not want to edit during the meeting
Cons
- Does not let you edit the content during the meeting
Application sharing
Application sharing is a method of displaying a specific program such as MS Word, or a Browser (IE, Safari, Chrome, FireFox). It displays to the participants, just as the Presenter sees it on their computer.
Pros
- Is dynamic. Allows users to see changes in the content in real-time
- Lets you edit the content of any presentation or document open in the application (e.g. you can open an MS Word document and edit it based on feedback from the live meeting)
- Lets you grant attendees control of the application
- Is ideal for software demonstrations
- Lets you and attendees annotate the application and documents that are open in it
Cons
- Requires more bandwidth than File Sharing
- Participants can see typing errors
Desktop sharing
Pros
- Lets you quickly share multiple applications at once
- Lets you show any part of your desktop, including file directories
- Lets you grant attendees control of your desktop, access files, and run applications
- Lets you and attendees annotate your desktop and any applications
Cons
- Requires the most bandwidth among sharing options.
- Lets an attendee with remote control access any part of your computer and modify any files, which may be a security concern.
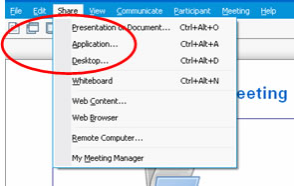
Content Sharing Menus
Sharing content can be initiated from a number of places within WebEx Meeting Center:
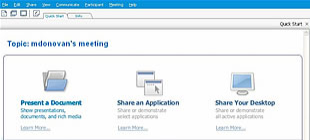
Quick Start Tab – Gives the host quick access to the most commonly used sharing options via icons directly through the meeting window, see Figure A below for an example of the Quick Start page.
Figure A – Quick Start page
Toolbar Icons - Allows access from the tools bar at the top of the meeting sharing tab.

Drop Down Menus - Allows access to the sharing options via the drop down menus at the top of the meeting window consistent with that of windows based programs.
Presenter tools
WebEx includes Annotation Tools which presenters can use to enhance the effectiveness of their discussion. These same tools can be made available to participants. The meeting Host grants access to the tools by selecting an individual (or the group icon ![]() ) listed in the Participant Panel using a right mouse click and then modifying the privileges to include Annotate.
) listed in the Participant Panel using a right mouse click and then modifying the privileges to include Annotate.
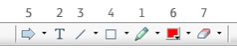
1) Highlighter
Lets you highlight text and other elements in shared content. For more options, click the downward-pointing arrow. Clicking this button again and then clicking the Close button turns off the Highlighter tool.
2) Text
Lets you type text on shared content. Attendees can view the text you have entered after you type it and click your mouse in the content viewer, outside the text box.
3) Line
Lets you draw lines and arrows on shared content. For more options, click the downward-pointing arrow. Clicking this button again and then clicking the Close button turns off the Line tool.
4) Rectangle
Lets you draw shapes, such as rectangles and ellipses on shared content. For more options, click the downward-pointing arrow. Clicking this button again and then clicking the Close button turns off the Rectangle tool.
5) Pointer
Lets you point out text and graphics on shared content. The pointer displays an arrow with your name and annotation colour. To display the laser pointer, which lets you point out text and graphics on shared content using a red laser beam, click the downward-pointing arrow. Clicking this button again and then clicking the Close button turns off the pointer tool.
6) Annotation color
Displays the Annotation Color palette. Select a color to annotate shared content. The Annotation Color palette closes.
7) Eraser
Erases text and annotations or clears pointers on shared content. To erase a single annotation, click it in the viewer. For more options, click the downward-pointing arrow. Clicking this button again and clicking the Close button turns off the eraser tool.
View Tools
The View Tools allow the presenter to adjust what is being seen while they are actively presenting or sharing. This toolbar can be found at the bottom left hand corner of the meeting console while a document or presentation is being shared.

1) Standard View/View Thumbnails
Clicking Standard View displays the shared content as you would normally view it. To display thumbnails, or miniatures, of shared pages, slides, or whiteboards to the side of the content, click View Thumbnails. This tool helps you locate a page or slide quickly. Click Standard View to return to normal viewing of the shared content.
2) Full-Screen View
Displays shared content in a full-screen view. Helps you to ensure that participants can view all activity on your screen. Also helps to prevent participants from viewing or using other applications on their screens during a presentation. Click ESC to return to the content viewer.
3) Rotate page right / left
Allows the presenter to rotate the presentation or document to the left or to the right if desired.
4) Document Size
Allows the presenter to adjust the view within the meeting window to allow them to fit a larger presentation into the meeting window as well as increase the size of the view.
5) Zoom In /Zoom Out
Lets you display shared content at various magnifications. Click this button, and then click the page, slide, or whiteboard to change its magnification. For more magnification options, click the downward-pointing arrow.
6) Synchronize Displays for All
For presenters, synchronizes all participants' displays with your display. Helps to ensure that all participants are viewing the same page or slide, at the same magnification, as in your display.
- style